Pin It button on image hover
Showing posts with label Floral Weave. Show all posts

Friday, 27 May 2022

show catch-up (by veronica)


My third post this month for Chocolate Baroque is a bit of a mixture, catching up on other stamps featured in the April show on Create and Craft.

The  canary bird rose stamp is lovely to colour in, but I just used bleach to take the colour out. The background was from a batch made using the inky plate and distress inks with some added stencilling- the leaves and stem were coloured with pencils 

Another inky plate background for the tree from be at peace, with a reflection below it created using acetate, coloured with pencils again. the sentiment was stamped on an offcut of the background piece, cut out and edged with black ink
Another inky plate background, with the open weave  background stamped in grey first, then the floral weave stamp coloured with felt tip marker pens stamped twice to build up the colour - I used a stamping platform for this.

Sentiment on a scrap of the background and a black mat.

 The final card used the flower from life is wonderful stamped in black ink onto a sponged background. The flower was coloured with pencils and the butterfly with shimmer paints. The flower head was stamped onto spare card, painted with watercolours ,fussy cut out and glued over the original image.  Random parts of the open weave stamp were stamped on the background using a green distress ink and then I doodled round the edges with a fineliner pen. The sentiment was stamped onto spare card, cut out , more doodled edges.


Monday, 23 May 2022

Floral CAS Cards (by Judith)

Hello everyone, I hope that you are keeping well. I have some clean and simple cards to share with you today for my final post this month. I demonstrated these designs on Create and Craft last month, and I hope that you managed to catch the TV shows.

My first two cards are similar in design; I used a round gelli plate to create a background, inking up the plate, and for the first design, I stamped the Open Weave stamp onto the gelli plate before I stamped the gelli plate straight onto my card blank. I then stamped one of the large flowers and a leaf three times from the Sunny Sunflowers stamp set onto the card using Veesafine ink. I used a fineliner pen to draw some little stems for the leaves. I could have used Masking Tissue to mask the flower, then stamp the leaves, but these cards are all about making life simple. I coloured the image with pencils and added a sentiment from the Amazing Mackintosh Words stamp set.

For the second card, I again inked up the gelli plate and then stamped the Floral Weave stamp onto the gelli plate before stamping the gelli plate straight onto the card blank. I stamped a couple of sunflowers onto the background and coloured them with pencils. I added some black dots with a fineliner pen and some glitter glue in the centre of each flower for a bit of sparkle.

For my final card, I stamped Studded Lattice onto an 8" x 8" card blank using Distress Oxide ink. I added a couple of sunflowers and some leaves in opposite corners. Using a fineliner pen, I drew some lines and curls to link the flowers and leaves together. Do not be aftraid to draw things freehand yourself to add to the stamps. I could see elements within the stamps that I could use to embellish the images and extend the design, you can try this youself. Practise on a piece of paper until you feel confident, and then just go for it! Be brave and do not hesitate, that would be my best advice.

I hope that you will try some of my suggestions, thanks for stopping by,


Judith xx

Friday, 20 May 2022

Purple Pleasures by Doreen

Purple Pleasures


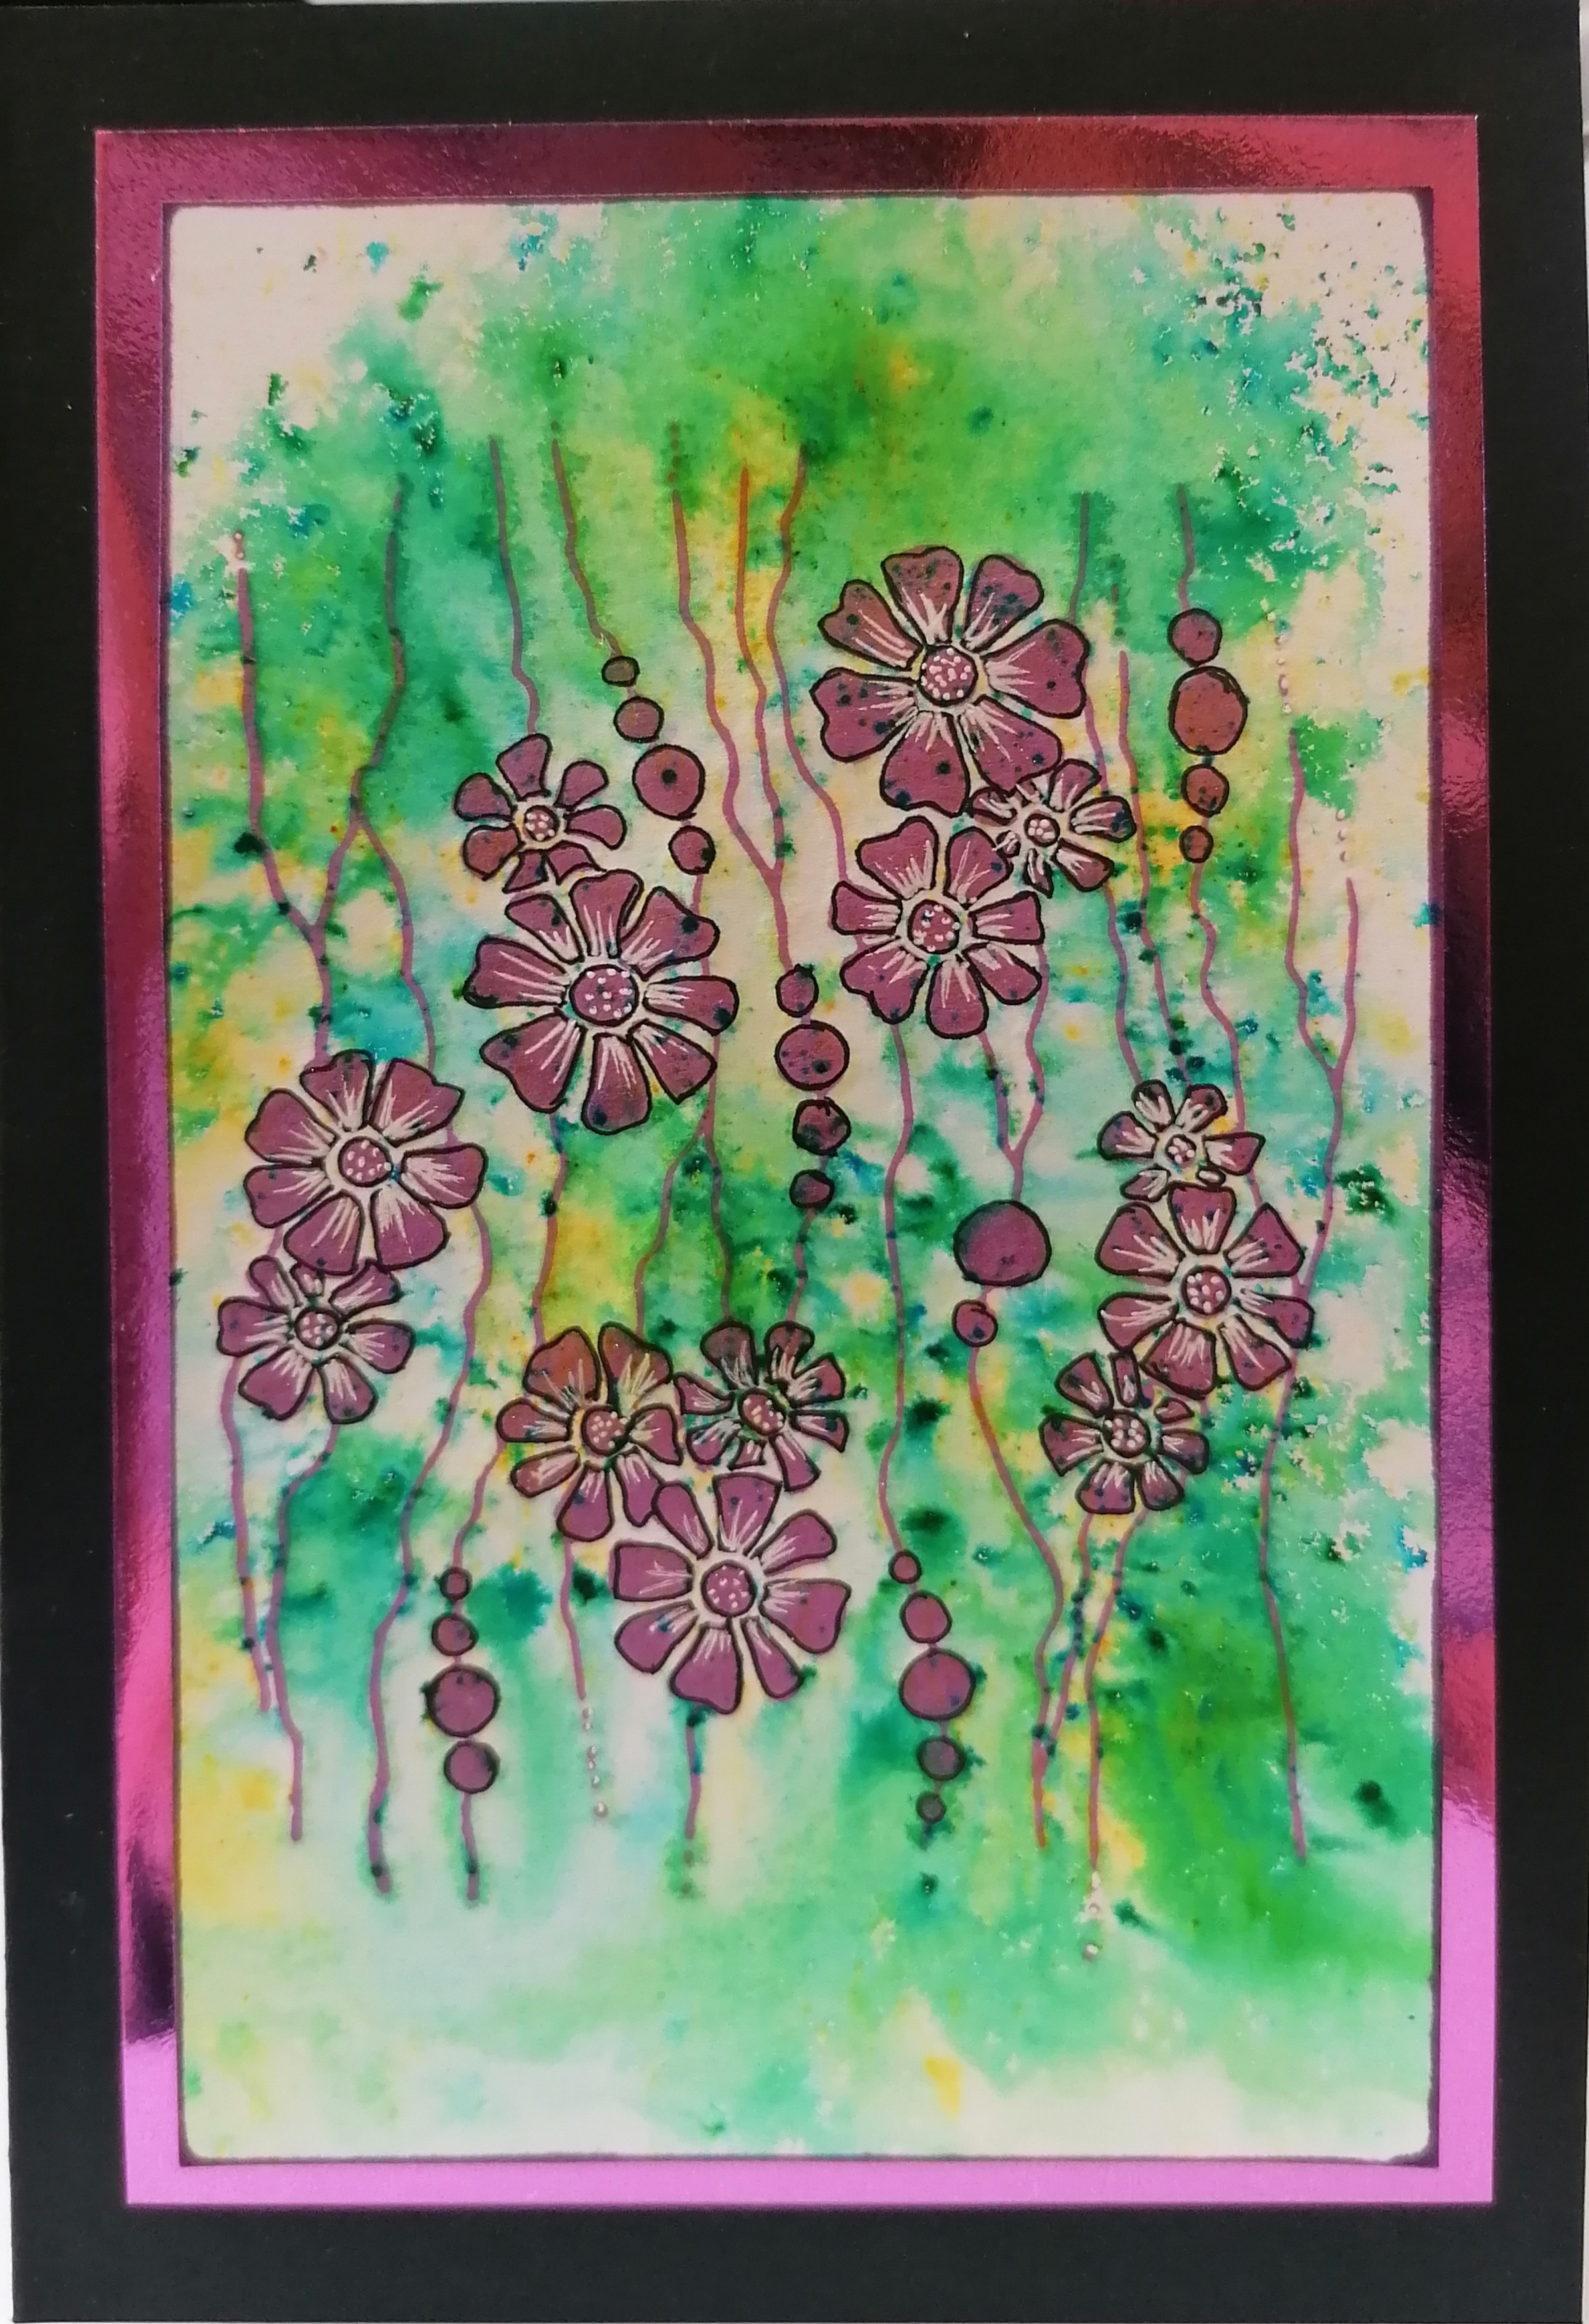
Hello everyone, welcome to my second post of the month, today I would like to share one of my makes using the Floral Weave stamp set. 
 This is a detailed stamp and so versatile it could easily make a nice little set of thank you cards by simply stamping onto a round or square blank and then mount onto to card, even half and half if you make 6 cards make 3 with round images and 3 square images. Even stamped in monotone they will look fabulous.

With this card I used a Brusho background using Yellow, Turquoise and Green. Leave it to dry naturally and then I stamped using Versafine Clair Purple Delight.
To bring out extra detail in the stamp I used a Black Fineliner Pen and a White Gel Pen, using the detail of the stamp to guide me. 
After looking at the finished piece I felt it needed something else so using a Clear Sparkle Brush Pen I decided to paint over the floral features of the stamp.

I mounted the topper onto a piece of Cerise Mirri Card from my stash of card. Then I cut and folded a piece of black card to make a card blank to mount the topper onto.

Here are a couple of other samples using the same stamp.


Thank you for looking in today and until the next time enjoy your crafting and hopefully some lovely weather too.

Love Doreen


Monday, 16 May 2022

Mystical Weave (By Tracy Thompson)


This is my second post for this month, with samples from April's shows.  My first creation is using the Be At Peace stamp, I love this tree as to me it's quite mystical so I went for a purple inky background.  After stamping my tree and colouring it I created some hills in the background and a sun, using posca pens did some blossoms on the ground.  I splashed some water on my ink for interest, which then made it look more like a night sky and the water splashes then looked a bit like stars.


This piece is created using two different stamps - Open Weave and Floral Weave,   So for the base of the card I took the Open Weave stamp and stamped several times to cover the background.  Then using a green and a yellow ink I did splashes all over it for some colour which co-ordinates with the topper I made.  For my topper I did some smooching with green and yellow Oxides then stamped my Floral weave stamp over the top.  This is a simple card but sometimes they make good cards for people who don't like fussy things.

I will be back near the end of the month with another couple of creations, thank you for popping by.

Happy crafting

Tracy x

Thursday, 12 May 2022

Delightful Flowers (by Sandra)

Hello I am sharing some more of my cards from the April show on Create and Craft.

My first card uses stamps from Gerbera and Friends.
First, I cut a piece of card 5.5x5.5". I used a cloud stencil and Distress Ink for the background. I then stamped the dandelion image in archival ink and added a sentiment from Birthday Words.  I made a 6x6" easel card base and  added a sentiment from Words to Dazzle and Sparkle as a stopper.


For my second card I used Floral Weave stamp set. I stamped in Versamark and embossed in gold. I mat and layered onto gold card and added some gold ribbon which I wrapped down the side of my card.

My last card today uses the Canary Bird Rose stamp set. This is a lovely open stamp, great for colouring. I used a stencil and Distress Ink for the background.  I then stamped onto some smooth card with Memento Ink and coloured with alcohol markers. I added a sentiment from Words to Dazzle and Sparkle and mat and layered onto gold card and then onto my 7x5 card base.


Thanks for looking
Sandra x

Wednesday, 23 August 2017

Summer Fayre (by Carole)

Hello everyone, today sees the final post from our latest Guest Design Team member, Carole Cann. She has created a beautiful Summery card for your inspiration. 

Carole writes:

Hello again, my card today uses the lovely Summer Fayre stamp. I know that this stamp has been well highlighted recently because of Lesley's Hochanda shows, but I couldn't resist using it, as it is such a beautiful image.

The background is from my stash and is made with Distress Inks. This has been over stamped with the Floral Weave stamp. Summer Fayre has been stamped onto parchmennt paper and clear embossed. Working from the back of the parchment, I highlighted the centre of the poppies and some strands of hair. These look white on the right side of the image. It was then coloured with watercolour pencils, also on the back, which gives a lovely soft look.
The sentiment is from the Harlequin Rose stamp set.
Thank you again, and happy crafting.

Carole 😃

Thank you so much Carole for another inspirational project. Carole will be back with us in a few months' time, but in the meantime, she will be helping out with lots of TV samples for the Hochanda shows, and contributing to the Fifteen Minute blog posts. You can see more of her work on her blog.


Wednesday, 30 December 2015

Rolled PaperTrees (by Debbie)

I'm finishing my 2015 of blogging with a couple of gifts I made. I have taken inspiration from a few different pinners on Pinterest. The style has popped up in the form of tags, cards and canvas's and I'm not sure where it started but I thoroughly enjoyed making them.
 
 
They are 20cm by 30cm and for the first I used my precious papers from Graphicus, I still have a few in my stash and stroke them from time to time.
The backgrounds for each of them is old book pages and mixtures of paints applied with baby wipes rather than the uniformity of a paint brush. When the paint had dried I stamped with the circles from Decorative Edges and blue ink.
 
 
The second is made in the same way using different colours and paint. The stamp I used is the
 Open Weave with brown ink. The paint background was a little bright so I also used sequin waste with more ink.
 
 
I changed the shape of the tree and added words to it, I have called them Wishing Trees. The rolls of paper were cut to different lengths and as on each tree, added the white pen faux stitching. The stamped background uses the Floral Weave stamp. This photo shows the computer generated words I have used.


Wishing you all 'Best Wishes' for 2016
Debbie

Sunday, 27 December 2015

Art Bag using the new background stamps (by Anne)

I created this sample for the recent TV shows from Chocolate Baroque on The Craft Channel. Lesley Wharton was fantastic and gave some wonderful demos using the new background stamps – Floral Weave, Open Weave, Studded Lattice and Baroque Orchids. They are so versatile for so many projects and styles.  

 I have used recycled curtains to create myself a large Art Carry bag. I used all four of the lovely new background stamps to decorate my fabrics. Now I have a lovely new bag to carry my unframed paintings to exhibition. You could easily adapt the design idea to make a shopping or handbag, or to decorate a ready-made bag.  Materials:
How it was made:
  1. I first made a simple strong bag to fit my board mounted artwork pieces. Simply 2 rectangles sewn together with handles to fit over my shoulder. This is a very large bag so it is easy to decorate and sew on the applique pieces while made up. For smaller bags and shoppers it would be easier to decorate the panels before completing the construction.
  2. Ironed Bondaweb onto the back of the cream lining. Leaving the paper backing in place cut out flowers and leaves with the dies. Printed the text to create a template for cutting the lettering.
  3. Stamped all the cut shapes with textile paint using a random mix of all four stamps (see tip). Left overnight to dry and cure.
  4. Stamped the front of the bag with the Floral Weave stamp. Left overnight to dry then fixed the paints with an iron (this makes the paint permanent and washable).
  5. Peeled the backing paper off all the cut out shapes and ironed onto the bag. This secures the shapes and heat fixes paints.
  6. Finally I stitched around all the shapes using a straight stitch and free machine embroidery. This is where you drop the fabric feed dogs and freely move the fabric beneath the needle (like drawing with a sewing machine and thread).

Tip for stamping with paints: I used to use a standard sponge for applying acrylics or textile paint to my stamp. I would apply paint to a palette then pick up with a sponge, dabbing to remove excess paint before applying to my stamp. After a short while the paint would start to dry on the palette. The detail of the stamping was also gradually lost as clumps of paint built up in the stamp crevices after repeat application of paint. When this occurs you need to stop and clean up the stamp before continuing. I now use Cut-N-Dry foam and the results are so much better. I apply plenty of paint directly to the pad and work it well into the foam with a palette knife. The foam can now be used to apply paint to the stamp repeatedly without reloading. Placing the foam paint side down on a craft mat while not using also keeps the paint moist for ages. I find this method gives much sharper printing, uses a lot less paint and is easier to clean up when finished.  Clean up well and do not leave paint to dry onto your stamp. I use a little soapy water and a soft tooth brush if needed.

Thursday, 17 December 2015

Weave Collection (by Julie)

Hello, thanks for dropping in. I hope you managed to catch one of Lesley's shows on The Craft Channel at the beginning of December. Not to worry if you didn't as I have two projects that use two of the fantastic new background stamps from the shows.


My first card is stamped with the Open Weave cling mounted stamp. I stamped the base card using the Weave stamp on a slight angle and continued until the card was completely covered. The main image was simply stamped with Onyx Black Versafine, doodled with a fine tipped micron pen and then coloured with Polychromos pencils. I then edged with Squeezed Lemonade Distress ink before mounting onto black card. I created the flowers by die cutting 3 black flowers and 3 white. I stamped the Open Weave over the white stamps and doodled and coloured as before. The sentiment is from Mackintosh Sentiments clear stamp set.


My second project is a decorative picture frame and could be made for a last minute Christmas present. The background has been stamped with a pink dye based ink using the new Floral Weave and edged with Peacock Feathers Distress ink. I have added flat back gems and dots of Crystal Stickles for added interest. The butterflies are from the Honeysuckle Butterfly set which I have coloured with Peacock Feathers and Pickled Raspberry Distress ink. The background has been stamped four times so you may have a couple of places where you haven't been able to make a neat join to the next image.....this is the perfect place to add your stamped butterflies....!
The white frame immediately around the stamped image has been covered with Viva Crystal Gel  and the picture frame was painted with white Gesso and dry brushed with a deep pink acrylic paint.

Thanks so much for stopping by and I hope you all have a lovely Christmas. 

Julie x


Monday, 14 December 2015

Recycled Brush Tin using the Floral Weave stamp (by Anne)


I created this sample for the recent TV shows on The Craft Channel. Lesley was fantastic and gave some wonderful demos. Simply a natural on the TV.

I used waste coloured paper which had been used underneath an alcohol ink colouring project. I kept it in my stash as I loved the random dots of colour. I used the Floral Weave stamp and black acrylic paint. The bold silhouette style is perfect for stamping over patterned papers.  I then added a little blue glitter glue to the flower centres. Now I have a pretty tin for storing my brushes on my work desk.  

Happy stamping, Anne x.


Sunday, 13 December 2015

Floral Birthday Wishes (by Asha)

Good morning! It's my turn to share with you a couple of card projects featuring the new Cling Mounted Individual Background stamps.

First up is this really simple birthday card. I heat embossed the Floral Weave stamp with WOW Ruby Romance embossing powder and then blended Tim Holtz Distress Inks to create the background. The greeting is from the Birthday Words stamp sheet, heat embossed with WOW Ebony embossing powder onto a piece of vellum and attached to the card with a couple of ruby red eyelets. To finish, I adhered a few flat-back pearls.


For my second birthday project, I'm using the Studded Lattice stamp, stamped with VersaFine Crimson Red ink and heat set with WOW Clear Gloss embossing powder. Next, I blended Tim Holtz Distress Inks to create the background and adhered it to my card base at an angle. I stamped the Dotty Centre Flowerhead on a piece of water colour paper, coloured it with Tim Holtz Distress Inks and fussy cut it before adhering it to the card with some foam tape. The greeting is from the Birthday Words stamp sheet, stamped with VersaFine Crimson Red.

So there you have it - a couple of easy birthday cards. You could easily make a few of these in various colour combos to add to your birthday stash. Details of tools and products used above are available on my blog. Don't forget to stop by for more fabulous makes by my team mates.

Thank you for stopping by today and enjoy the rest crafty weekend!

Beijinhos,
Asha

Saturday, 12 December 2015

Behind the Scenes (posted by Judith)

Hello everyone, I hope that you have been able to catch the TV shows featuring the Beautiful Backgrounds cling mounted stamps on the Craft Channel recently. The samples created by my Team Mates, and demos by Lesley were just amazing. I have a couple of projects to show you myself that were featured on the shows, and I hope that they will give you a little bit of inspiration in using these fabulous stamps.

My first project features the Floral Weave cling mounted stamp, and I have created an underwater scene, using stamps from the Seashore and Seadragon stamp sets.

I created a watery background on a piece of watercolour paper, by painting some water based ink onto the background, and dropping sea salt onto the paper while it was still wet. I left the background to dry before removing the salt. I stamped and embossed the background image using a lovely teal embossing powder, it works really well as a seaweed image on this card. I stamped and coloured the seahorse on a separate piece of card, before cutting it out and adhering it to the background. I stamped the sentiment, and matted the background onto teal card.

I added some little pearls to the flower centres to complete the card.

My second project is a canvas, combining a couple of the background stamps, Baroque Orchids, and Studded Lattice. I have added some flowers created using stamps from the Elegant Iris stamp set, and some die cut leaves. For full instructions on how I made this piece, hop over to my blog.

Thanks for stopping by, Judith xx

Thursday, 10 December 2015

New stamp releases and another TV show (by Lesley)

Hi there, I don't know if you managed to see the two Chocolate Baroque TV shows last weekend,  We launched some stunning new background stamps which were an exclusive to the Craft Channel but today we now have these on general release for you. 

The four stamps are:

Floral Weave, Open Weave, Studded Lattice and Baroque Orchids, all designed by Sue, of course, and all of them are large stamps that will suit every level of stamper.


Each stamp is indvidually mounted on cling and cut out ready to play with and represent fabulous value for money. That said, we do have our usual multi-buy option available and I know that with the versatility of these excellent designs, they will soon become firm favourites with you all.

Here are one or two or the samples from my TV demonstrations.


And if you would like to see more Chocolate Baroque on the TV then please tune in to the Craft Channel tomorrow (11th December) at 10am to watch 'More Stamps by Chocolate Baroque', which includes the launch of yet more new stamps. The show will also be repeated tomorrow evening at 9pm.

Please keep popping in to see all the beautiful projects that the Design Team girls made for the shows.